Reach Your Homelab with Cloudflare Tunnel and Protect It with Access
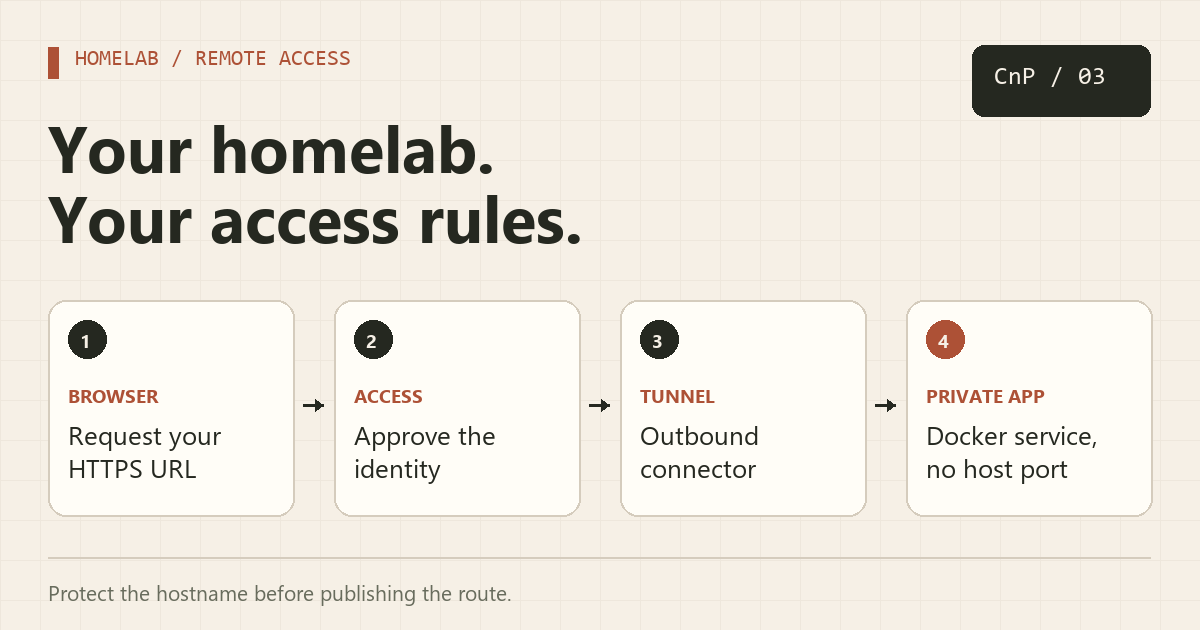
Cloudflare Tunnel lets a connector inside your home network make outbound connections to Cloudflare. You can reach a web application through a public HTTPS hostname without opening an inbound port on your router. Cloudflare Access then decides who may reach that hostname.
We will use a small test application first. Once authentication works, you can point the route at your actual dashboard. This guide covers a browser-based HTTP application, not a VPN for every protocol or a public RTSP video relay.
What you need
- A domain with an active Cloudflare DNS zone and a Cloudflare account.
- A configured Zero Trust organization and a login method such as an identity provider or email one-time PIN.
- A Linux server with Docker Engine and the Compose plugin.
- Outbound network access for the tunnel connector. No router port-forwarding rule is required.
The example hostname is lab.example.com. Replace it with your own subdomain. Keep your application's own login enabled as an additional layer.
1. Create the Access application first
In the Cloudflare dashboard, open Zero Trust → Access controls → Applications. Create a new Self-hosted and private application and add the public hostname lab.example.com. Older dashboard layouts may call this simply “Self-hosted.”
Add an Allow policy that includes only your specific email address or the appropriate identity-provider group. Select the intended login method and choose a session duration. Protect the whole hostname unless you intentionally want different rules for individual paths.
Save the application before publishing the tunnel route. Avoid an “Everyone” Allow policy or a Bypass policy for an admin tool. Access applications deny users by default until an Allow policy matches.
2. Create a remotely managed tunnel
Open Networking → Tunnels, create a cloudflared tunnel, and name it homelab. Choose the Docker connector instructions. Copy only the tunnel token from the provided command; do not paste the entire Docker command into the file below.
On the server, create a protected working directory and edit the token file locally:
mkdir -p ~/homelab-tunnel
cd ~/homelab-tunnel
umask 077
touch tunnel.env
chmod 600 tunnel.env
nano tunnel.env
TUNNEL_TOKEN=REPLACE_WITH_YOUR_TUNNEL_TOKEN
Keep the actual file out of Git, screenshots, and support messages. An environment file avoids putting the token in your Compose source or shell history, but Docker administrators can still inspect a container's environment. Rotate the tunnel token if it is disclosed.
3. Start the connector and demo service
Save this as compose.yaml in the same directory:
services:
  demo:
    image: traefik/whoami:v1.11
    restart: unless-stopped
    networks: [homelab]

  cloudflared:
    image: cloudflare/cloudflared:latest
    restart: unless-stopped
    command: tunnel --no-autoupdate run
    env_file:
      - tunnel.env
    depends_on:
      - demo
    networks: [homelab]

networks:
  homelab:
docker compose config --quiet
docker compose up -d
docker compose ps
docker compose logs --tail 50 cloudflared
The connector should register tunnel connections, and the dashboard should show the tunnel as healthy. The demo application has no published host port. Both containers share the same Docker network so the connector can resolve demo.
The example uses the current cloudflared release via its latest tag for initial setup. For a repeatable production deployment, select and pin an approved release tag or image digest, then update deliberately.
4. Add the published application route
Under your tunnel's Routes, add a Published application route. Use hostname lab.example.com, service type HTTP, and service URL demo:80 (equivalent to http://demo:80).
Inside the connector container, localhost means the connector itself. It does not mean another Compose service or the Docker host. For an existing containerized dashboard, join the connector to its network and use that service's name and internal port.
The public URL uses HTTPS even though this isolated demonstration uses HTTP between the connector and demo container. For an origin on another machine, evaluate that network segment and use properly verified HTTPS where appropriate. Do not disable origin certificate verification merely to hide a certificate configuration error.
5. Test both access outcomes
- Open
https://lab.example.comin a private browser window. You should reach Access authentication before seeing the demo output. - Sign in with the allowed identity. The demo should show request information.
- Use a separate private session with a disallowed identity. It must not reach the application.
- Review Access logs and confirm there is no second unprotected hostname exposing the same admin service.
Troubleshooting
- 502: the connector may be online but unable to reach the origin. Check the service name, internal port, network membership, and application logs.
- Tunnel disconnected: check the token, container logs, DNS resolution, and outbound firewall rules.
- No login prompt: verify the exact hostname and path coverage in Access, then check for Bypass policies or an existing authenticated session.
- Redirect loop: check the application's public base URL and reverse-proxy settings. An origin that automatically redirects HTTP to HTTPS may require an HTTPS service URL.
Once these checks pass, replace the demo origin with your intended app and repeat the allowed/denied tests. Uptime Kuma is a useful next project to host behind this setup.
Official references
About Copy And Paste
Just a curious soul dabbling in the world of IT. Exploring coding, sysadmin tricks, and tech automation — because who doesn’t love copying and pasting clean code that just works?
More in Software Install Tutorials
Run Uptime Kuma with Docker Compose and Test Your First Alert
Deploy Uptime Kuma with persistent storage, monitor a meaningful endpoint, and test both outage and recovery notifications.
RTSP Stream Stuck? Add a Video Watchdog for go2RTC
Check that your go2RTC stream actually decodes a video frame, then recover after repeated failures with a restart cooldown.